Remember when making a video meant finding a quiet corner, fussing with lighting, and hoping your software wouldn’t freeze right before you finished editing? In 2026, Personate AI changes everything. Now you can write a script, upload a short video or clip of yourself, and Personate creates your digital twin as an avatar that looks and sounds like you. With a single click, your message becomes a polished and personalized video, ready to share anywhere. There is no filming, no technical stress, and your virtual self is always camera-ready. This guide walks you through how Personate’s AI video agent works, what makes it different, and how you can create share-ready videos that truly feel like you.
TL;DR
An AI video agent turns ideas into complete videos through guided steps
Personate’s video agent lets you create videos without filming or editing
You start by sharing a simple idea in plain language
The agent expands it into a script and storyboard for review
You customize the avatar, visuals, and music before rendering
The final video is ready to download and share in one click
What Is an AI Video Agent?
Let’s be honest: most of us want to make videos, but the thought of cameras, scripts, and editing software can make anyone put it off until “next week.” That’s where video agents come in, they give you a new way to bring your stories and messages to life, without the usual hurdles.
So, what exactly is an AI video agent?
It is a smart digital assistant that listens to your ideas in a simple chat and turns them into real, ready-to-share videos.
No need to set up equipment or learn editing software. Just start a chat, describe your topic, and the video agent handles the rest.
The video agent researches, scripts, and assembles your video automatically, using lifelike avatars and voices. You can even create a digital twin by uploading a short video or clip of yourself, so your avatar looks and sounds like you.
Each video can be personalized. Add a name, date, product, or any detail to make your message feel unique.
You stay in control with options to adjust the script, visuals, music, and scene style right inside the workflow.
It’s almost like having a video production team right inside your chat window. Just tell Personate’s video agent what you want, and watch your idea become a polished video you’re ready to share.
How to Create Your First Video with Personate’s AI Video Agent
Creating your first video with Personate feels a little like sending a message into the future and watching it come back, polished, confident, and somehow more put-together than you felt when you typed the script. No cameras. No lighting anxiety. No re-recording the same sentence twelve times. Just you, an idea, and an AI video agent that knows how to show up.
This guide walks you through the exact steps to create your very first AI-generated video with Personate, even if you have never made a video before.
What You’ll Need Before You Start
Before you begin, make sure you have:
A Personate account
A short message or script idea (30–90 seconds works best)
A clear goal for the video (welcome, outreach, demo, update, or announcement)
That’s it. Personate handles everything else behind the scenes.
Step 1: Share Your Idea
You will see a simple input area. This is where you describe what you want the video to be about. One or two sentences is enough.
What to Write
Describe the message in plain language. Focus on what the video should communicate, not how it should be produced.
Think about:
What the video is about
Who it is for
What the viewer should understand or feel
Write it the way you would explain it to a teammate.
Examples of Ideas
Your idea can be practical, creative, or strategic.
A short product update announcing a new feature
A welcome video for new users
A cinematic video imagining food delivery on Mars
A founder-style video about the future of AI
A simple educational video explaining a concept
All of these are strong starting points.
Optional Details (If You Have Them)
You can include any of the following, but you do not need to.
Optional detail | Example |
Length | 30–60 seconds |
Tone | Calm, confident, friendly |
Audience | Customers, team, public |
Style | Clean, cinematic, minimal |
Music | Subtle, energetic, none |
If you leave these out, Personate will make reasonable choices for you.
Step 2: Review the AI’s Expanded Idea
After you share your idea, Personate’s AI video agent expands it into a clearer, more complete concept.
This is not a final script yet. Think of it as a refined version of your original idea, written back to you for confirmation.
What You’ll See
The AI presents:
A clearer description of the video’s purpose
An expanded angle or narrative
Suggested direction for tone and structure
It takes your short input and fills in the gaps, so you are not starting from a blank page.
What You Can Do
At this stage, you stay fully in control. You can:
Accept the idea as it is
Edit or refine specific parts
Add new context or constraints
Simplify or narrow the focus
You are shaping the direction before anything is locked in.
What to Look For
As you review, ask yourself:
Does this reflect what I had in mind?
Is the message clear?
Does the tone feel right for the audience?
If the answer is yes, you can move forward.
If not, make small adjustments and continue.
Step 3: Review the Research and Context
Once you approve the expanded idea, Personate’s AI video agent adds context to support your video.
What this looks like depends on the kind of idea you started with. The AI adapts its approach based on whether your video is factual, product-focused, or imaginative.
What You’ll See
If your idea is product, educational, or thought leadership–driven, the AI may share:
Background information or framing
Key points to support the message
Clear explanations to improve understanding
If your idea is imaginary or speculative, the AI may instead provide:
World-building details
Logical extensions of your concept
Narrative context to make the idea feel believable
A consistent internal logic for the story
In both cases, the goal is the same: make the video clearer, stronger, and more engaging.
What You Can Do
You stay in control at this stage. You can:
Accept the context as is
Edit or simplify it
Remove anything that feels unnecessary
Add your own perspective or creative direction
Push the idea further, or rein it back
Nothing moves forward without your approval.
What to Look For
As you review, ask yourself:
Does this support the story or message I want to tell?
Does it feel credible, even if it is imaginary?
Is the level of detail right for the audience?
For creative ideas, consistency matters more than accuracy.
For factual ideas, clarity and relevance matter most.
Step 5: Review the Storyboard and Visual Direction
Once the script is finalized, Personate generates a complete storyboard for your video.
This is where everything comes together visually.
What You’ll See
Your screen is now split into two working areas:
On the right: the storyboard
Each card represents a scene
Scenes include the spoken line and a visual prompt
Cards are ordered from start to finish
You can drag cards to rearrange the sequence
On the left: the chat
This is where you continue guiding the AI
You can ask for changes in plain language
Every update happens through conversation
Together, this gives you both structure and flexibility.
What the Storyboard Includes
Each scene typically shows:
The line of narration
A detailed visual prompt describing the scene
Camera direction and mood
Timing and pacing cues
For imaginary or cinematic ideas, visuals may include dramatic environments, speculative technology, or story-driven sequences. For product or thought leadership videos, visuals are cleaner, more explanatory, and focused on clarity.
What You Can Change at This Stage
Nothing is locked in yet. You can make changes in several ways.
You can:
Rewrite the script
Adjust or regenerate visuals
Change the actor or avatar
Change the music
Reorder scenes
Push the idea further creatively or simplify it
All of this happens through the chat or the action buttons above the storyboard.
Rendering the Video
When everything looks right, click Render.
Personate then:
Generates the final video
Applies visuals, voice, and music
Produces a share-ready result
You will see a confirmation once the video is ready, with options to view or download it.
If you want to make changes after rendering, you can return to the storyboard and render again.
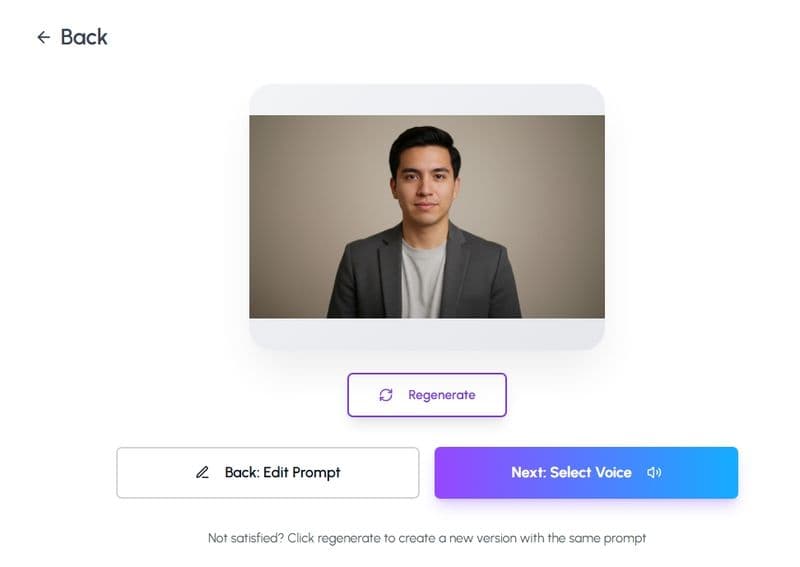
Step 6: Customize the Actor, Music, and Graphics
Before rendering the final video, Personate gives you full control over how your video looks and sounds. You can make these changes at any time from the storyboard view.
This step is optional, but powerful.
Change or Create an Avatar
Click open the Avatar panel.
You have two main choices:
Select from the avatar library: Choose from a range of ready-made avatars, each with different looks, styles, and camera angles.
Create your own avatar: You can also click ‘Create Avatar’ and upload any one of these:
A photo
A short video
A brief description
Personate uses these to create a digital person that can be reused across videos. You can switch avatars at any time without affecting the script or visuals.
Choose or Turn Off Background Music
Open the Music panel.
Here, you can:
Browse multiple music styles and moods
Preview tracks before selecting
Switch between calm, cinematic, motivational, or subtle options
Turn background music off entirely if you want a voice-only video
Music is optional. If your message works better without it, you can disable it with one click.
Customize Graphics and Visual Assets
Open the Graphics panel to control on-screen visuals.
You can:
Use the existing generated visuals
Upload your own graphics or videos
Add text overlays
Choose from stock graphics
Generate new images or videos using AI
This is useful if you want to:
Add branding
Insert product screenshots
Include charts, diagrams, or captions
Blend real assets with AI-generated visuals
What to Focus On
At this stage, think about:
Does the actor match the tone of the message?
Does the music support or distract from the story?
Do the visuals help the viewer understand the idea faster?
You can keep things simple or push them creatively. Both work.
Step 7: Render, Download, and Share Your Video
When everything looks right, click Render. Personate generates the final video using your selected actor, visuals, and music. Once it’s ready, you can view it, download it, or make quick adjustments and render again. There’s no friction.
Conclusion
You begin with a simple idea, not a script or a setup. Personate guides you through shaping that idea step by step, letting you review the structure, visuals, sound, and delivery before anything is final. When you’re ready, a single click turns your work into a polished, share-ready video. There’s no filming, no editing, and no production stress. Just a clear path from thought to video, built to feel natural, flexible, and fast.